ASTR 135 Lab: Introduction to Spectroscopy
First, a "photographic" style versus "line plot" style for
illustrating spectra are equivalent to each other. Examine the two
panels below. They represent the same absorption-type spectrum
(this happens to be an optical spectrum of the twilight sky, with blue
to the left, red to the right).

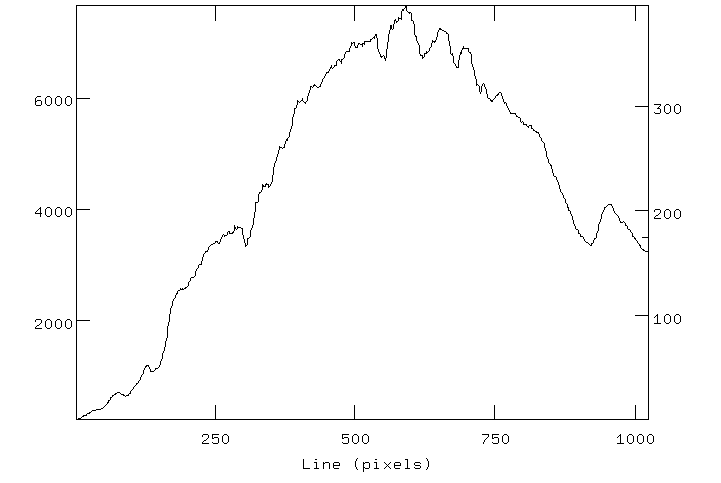
Can you see that the bright parts of the "photographic style" spectrum
correspond one-to-one with the high-value parts of the line plot? And
the dark lines correspond to dips in the line plot. ACTION 1:
Draw 4 or 5 vertical lines connecting prominent spectral features in
the two panels.
In the photographic style the intensity of the spectrum is given by
the "lightness" of the ink. In the line plot style the intensity of
the spectrum is given by the height in the y-axis direction. In both styles,
the x-direction corresponds to wavelength.
When displaying spectra, we will use both of these styles interchangeably.
Calibrating the spectrograph
There are two key elements in your spectrograph. The diffraction
grating is where you put your eye at the narrow end, and the
entrance slit is indicated by the pointy parts at the right side
of the wide end. The rest of the wide end is occupied by a
semi-transparent wavelength (and energy) scale. Light enters the slit
and travels to the diffraction grating, where it is bent according to
its wavelength so that individual lines will appear against the
wavelength scale. You must point the right-hand side of the
spectrograph toward the light source, even though you must be looking
"straight" to see the spectral lines. If the plastic strip has
slipped out, let the instructor fix it - it's a tricky operation.
ACTION 2: point the spectrograph at any convenient bright light
source and look into it. If necessary, rotate the diffraction grating
slightly until the rainbow falls horizontally all the way
across the wavelength scale.
Now, we need to check the wavelength scale itself using a lamp with
lines of known wavelength. We use the Hydrogen lamp for this purpose,
specifically the brilliant red H-alpha line (level 3 to level 2
transition in the Hydrogen atom). Its wavelength is 656.3 nm.
ACTION 3: Observe H-alpha through the spectroscope. Estimate to
the nearest nanometer the wavelength that it appears to land
on. Record this in your report. ACTION 4: Compute the (you
minus 656 nm) difference in wavelength and record this in your
report. This additive shift can be used to convert your measured
wavelengths onto a more accurate scale by algebraically subtracting it
from any wavelength you measure. There may indeed be additional warps
or stretches in the spectrograph wavelength scale, but we will not
correct for these.
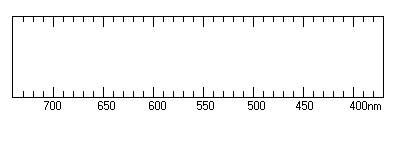
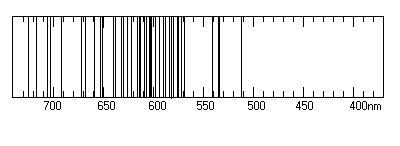
Some Preparations
Below you will find a table of wavelengths of commonly seen lines for
different elements. Below that you will find "photographic style"
templates, with the one for Neon already sketched in as an example.
ACTION 5: Using the listed wavelengths, sketch in all of the
templates. If a table entry is marked with an "s" it indicates a
brighter-than-typical line, but not all bright lines are marked.
Notice that the template spectrum boxes are labeled with
wavelength increasing to the left (and photon energy increasing to the
right). This is not standard! But we plot this way because this
is the way our spectrograph's wavelength scale is arranged..
Table 1: Optical wavelengths in nanometers.
| Hydrogen | 571.9 | 667.8 | 487.6 | Krypton |
| 410.2 | 574.8 | 671.7 | 488.8 | 427.4 |
| 434.0 | 576.4 | 692.9 | 515.1 | 428.3 |
| 486.1 | 580.4 | 703.2 | 516.2 | 431.9 |
| 656.3 | 582.0 | 705.9 | 518.7 | 432.0 |
| | 585.2 | 717.3 | 522.1 | 435.5 |
| Helium | 588.2 | 724.5 | 542.1 | 436.3 |
| 402.6 | 590.2 | 743.9 | 545.2 | 437.6 |
| 412.1 | 594.5 | | 549.6 | 440.0 |
| 414.4 | 597.6 | Argon | 550.6 | 445.4 |
| 438.8 | 602.9 | 394.9 | 555.9 | 446.4 |
| 447.1s | 607.4 | 404.4 | 560.6 | 450.2 |
| 471.3 | 609.6 | 415.9 | 565.1 | 480.7 |
| 492.1 | 612.8 | 420.1 | 574.0 | 556.2s |
| 501.5s | 614.3 | 425.9 | 583.4 | 557.0s |
| 587.5s | 616.3 | 427.2 | 591.2 | 587.1s |
| 667.8 | 621.7 | 430.0 | 592.8 | 645.6s |
| 706.5 | 626.6 | 433.4 | 603.2s | 758.7 |
| | 630.4 | 434.5 | 604.3 | 760.1 |
| Neon | 633.4 | 451.1 | 605.2 | |
| 511.6 | 638.3 | 442.4 | 605.9 | Mercury |
| 533.0 | 640.2 | 459.6 | 610.5 | 404.6 |
| 534.1 | 650.7 | 470.2 | 617.0 | 435.8 |
| 540.0 | 653.2 | 475.3 | 641.6 | 546.0 |
| 569.0 | 659.9 | 476.9 | | 577.0 |
| | | | 579.0 |
TEMPLATE SPECTRA:
| Hydrogen (H): |
 |
| Helium (He): |
|
| Neon (Ne): |
 |
| Argon (Ar): |
|
| Krypton (Kr): |
|
| Mercury (Hg): |
|
Identifying Elements from Spectra
ACTION 6: For each of the following create (1) a description of
the spectrum (continuous, absorption, or emission), (2) a table of
observed wavelengths, corrected by adding or subtracting the little
shift from Action 4 above, (3) plot a "photographic style"
spectrum in the boxes provided below, and (4) provide an
identification of the elements involved, if at all possible. In any
case of trouble with any of the above points, provide a complete
explanation.
- Laser. A laser works by greatly amplifying one single emission
line. Since you only get one line to look at you may not be able to
pick one element for sure. Give a list of the candidates. (Additional:
a laser is red. Make sure the line you see is also red.)
- Ordinary incandescent tungsten-filament light bulb, frosted to scatter the light.
- Fluorescent light bulb. You can identify one element for sure,
but that may not be the only element present. Explain.
- The Sun (sidewalk, clouds) if available, otherwise use the solar
spectrum chart. Even a careful student may not be able to identify
many elements in the solar spectrum using the fairly limited number of
lines that are visible.
- - 8. Each of 4 unknown gas tube spectra. Groups may internally share
wavelength data tables to save time. Everybody sketches the spectrum.
Write the wavelength data and comments on separate sheets.
| Laser: |
|
| Tungsten bulb: |
|
| Fluorescent bulb: |
|
| Sun: |
|
| Gas tube 1: |
|
| Gas tube 2: |
|
| Gas tube 3: |
|
| Gas tube 4: |
|
ACTION 7: Answer the following wrap-up questions.
- Give any comments you have about the spectra you have just observed.
- Suppose you took a spectrum of a previously unseen astronomical
object. How would you go about figuring out what elements or compounds
the object was composed of?
- Compute the wavelengths for H-beta (n=4) and H-gamma (n=5) using
Balmer's formula (page 120). Compare them to the table 1 values.
Hopefully this exercise has given a glimpse into the mind-bogglingly
useful nature of spectroscopy. Obviously there is a lot about spectra
that we cannot cover during our short meeting time, but perhaps at
least we have learned that there is a quite a lot going on in the
world that is not immediately apparent to the human eye.